Rumpus 1.3 User's Guide

Remote User Account Administration


In general, Rumpus options can be set once and forgotten. That is, you will probably not need to adjust most basic configuration options on a regular basis. The exception to this is maintaining User Accounts, which may need to be added, updated, or deleted frequently.

For this reason, Rumpus supports Web-based user account management. This allows you to configure users and their access privileges from anywhere on the Internet using a standard Web browser. In addition, you can allow users to change their own passwords using a Web browser, improving security by encouraging frequent password rotation.

Configuring The Server

Rumpus supports Web admin using the CGI standard to process requests sent by your primary Web server. If you aren't currently running a Web server on your FTP server, and want to use Rumpus Web administration, you will need to choose a Web server to perform this function. In this case, we suggest using Web Sharing, which is built into Mac OS 8.0 and later. Web Sharing is free, very simple, and uses very little of the machine's resources. If the Web Sharing control panel is missing from your Mac, it can be installed from your OS 8 CD-ROM.

To use Web Sharing, simply open the "Web Sharing" control panel, choose a folder to serve from, and click "Start". By default, Web sharing will not serve files when the file (in this case, the Rumpus application) is outside the shared folder. So, you will probably want to select the Rumpus folder to be shared. You can also select a folder above the Rumpus folder. Version 1.5 of Web Sharing provides an option to serve aliases outside the shared folder, allowing you to select any folder on your hard drive to serve from. In any event, the folder you choose will be the server "root" folder, which will be discussed below.

If you already are running a Web server on the Rumpus Macintosh, then you can use it to perform Rumpus administration tasks. By using your existing server and the CGI standard (instead of Rumpus using a built-in Web server engine), Rumpus avoids potential port conflicts and makes more efficient use of CPU and networking resources.

Whether you are using Mac OS Web sharing, or an existing server to provide Web services for Rumpus, the next step is to enable the server to find the Rumpus application. Create an alias to the Rumpus application by selecting it and choosing "Make Alias" from the Finder's "File" menu. Name the alias "Rumpus.cgi". Be careful to name the alias exactly, with no extra whitespace or hidden characters. Web servers use filenames to locate files (including CGI applications), so if the filename of the alias is not correct, your setup will not work.

Next, put the alias into the Web server root folder. In the case of multi-domain servers, and in some cases where servers automatically look for CGIs in pre-defined sub-folders, you may need to place the alias one level down from the root. In general, the alias should go in the server root folder, but if you encounter problems, see your server's User's Guide for information on using CGI applications.

Your Web server is now ready to use Rumpus as a CGI to permit remote Web administration. Now, launch Rumpus and open the Configuration window. Click the "Admin" tab to bring it to the foreground.


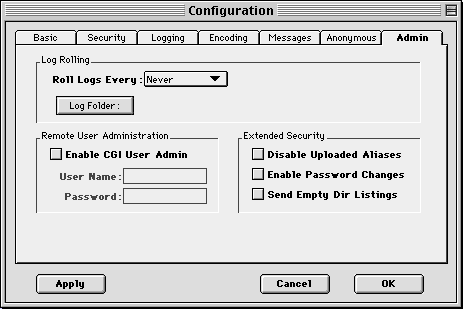
Figure 13: Configuring Rumpus For Remote User Management

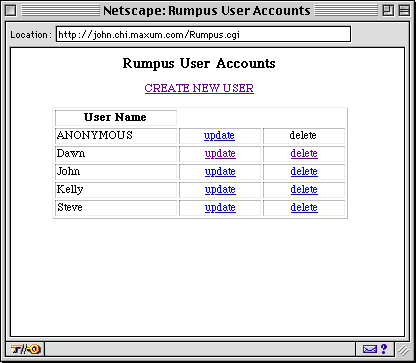
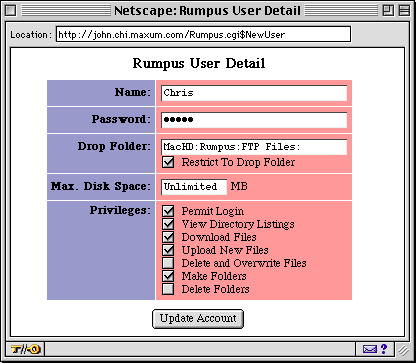
Select the "Enable CGI User Admin" checkbox option, and enter a username and password, which will be required when you attempt to administer user accounts remotely. Click "OK" to save your changes.

Using Rumpus Remote Administration

To add, delete, or modify user accounts remotely, open a Web browser and enter the URL:
    http://www.yourserver.com/Rumpus.cgi
Of course, you will need to replace "www.yourserver.com" with the domain name or IP Address of the Rumpus server. When prompted for a username and password, enter them exactly as you did in the Rumpus Configuration window. When you correctly identify yourself, you will be presented with a Web page listing all the currently configured user accounts.


Figure 14: The User Account List

This figure shows several accounts that have already been created. If no accounts have been created yet, then only "ANONYMOUS" will appear in the list.

To create a new user account, click the "CREATE NEW USER" link. This will open the user detail form, shown below.


Figure 15: The User Detail Page

Fill in the fields accordingly. The username and password fields are straightforward. To specify a drop folder, you will need to enter a complete path, from the disk drive (volume) name, down through the folder hierarchy, and concluding with the specific name of the drop folder. This folder will be created for you automatically if it doesn't already exist. Be very careful when entering the path to the drop folder, as a single typo or mistake will cause the user account to be unusable. You may want to copy and paste the drop folder from a similar user account and make the needed changes, reducing the chance of an error.

Finally, enter the maximum size of the user's drop folder and check the various permission checkboxes that are appropriate for the defined user. When complete, press the "Update Account" button to save the new user. After saving, a confirmation message will be displayed with a link back to the user accounts list.

From the user accounts list, you can also update and delete users. To modify an existing account, simply click the "Update" link associated with the user you need to change. To delete an account, click the corresponding "Delete" link. When you use the Delete link, a warning message will be displayed asking you to confirm the delete action.

Allowing Users To Change Their Own Passwords

To enable users to update their own passwords, you will first need to create an alias to Rumpus and put it in your Web server root, as described above. Also, be sure to enable the "Enable Password Changes" option on the "Admin" tab of the main configuration window within Rumpus.

Once Rumpus has been configured, you can access the default password change form using the URL:

    http://www.yourserver.com/Rumpus.cgi$UPCReqForm
The change password form is shown below.


Figure 16: Users Can Change Their Own FTP Passwords

This form is straightforward, and can be used simply by linking to the URL from any of your existing Web pages. So, for example, you could have an "FTP Information" page for your users with FTP accounts somewhere on your Web site. This page could then enable users to change their passwords by including a line like:

    <A HREF="http://www.yourserver.com/Rumpus.cgi$UPCReqForm">Change Your FTP Password</A>
Note that you can customize this page to suit your own needs. Start by accessing the page from a browser as described above. Then use the "Save As" command in your browser to save the HTML Source of this page. The change password form page has 5 critical elements that you must maintain:

  1. A text input field called "Name"
  2. A text input field called "CPas"
  3. A text input field called "NPas"
  4. A text input field called "VPas"
  5. The FORM uses an ACTION of "/Rumpus.cgi$UserPasswordChange"

To customize the password change form, simply create a new Web page with these 5 elements. Use the source of the default page as a reference to creating the new Web page. Any Web form with these 4 input fields that is submitted to Rumpus using the "UserPasswordChange" path argument will be processed accordingly, allowing you complete control over the HTML formatting of the input form. In the example "FTP Information" page above, this form could be incorporated directly into the FTP Information page, or the link could change to something like:

    <A HREF="MyChangeForm.html">Change Your FTP Password</A>


[ Previous | Table Of Contents | Next ]

Copyright © 1997-9 Maxum Development Corporation
http://www.maxum.com/